LET'S CUT TO THE POINT: SHEARING ACCURACY CAN MAKE OR BREAK YOU
The safety, quality and efficiency of shear slitting affect your bottom line and reputation.
A precise cut can mean the difference between getting your customers’ orders out the door and throwing out a batch of ruined materials.
Accurate slitting is critical whether you’re in paper, corrugated, films, foils, flexible packaging, food, nonwovens or another industry. Thankfully, you can eliminate existing problems and avoid future dilemmas with the right know-how.
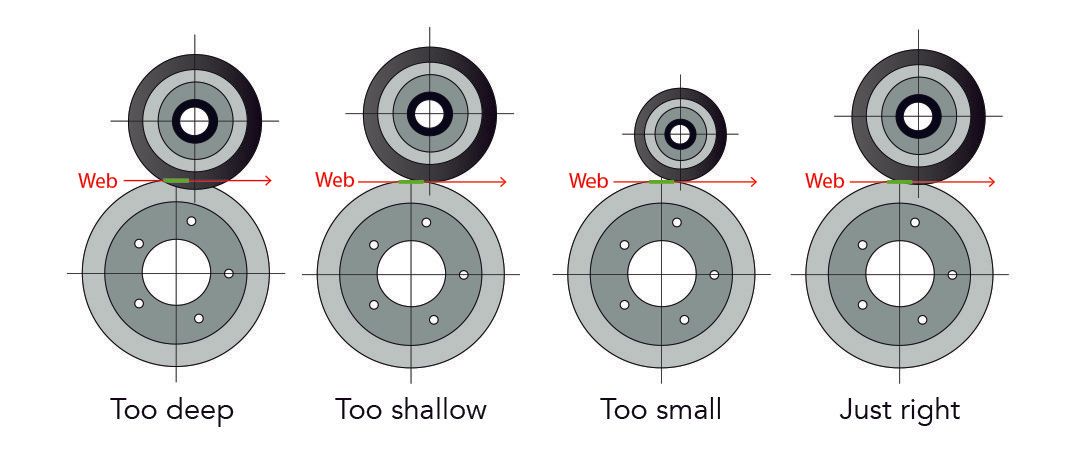
Is my depth set for optimal cutting?

When the top slitter blade is the right size and set to the proper depth, the precision and quality of the cut will be just right.
My material plows and crimps.
When the overlap of the top slitter blade and the bottom blade is too deep, the material is pushed down and the quality of the cut suffers.
The material is chipping.
Incomplete cuts occur when the blade overlap is too shallow, causing the blade to skip.
I have numerous cutting issues.
Time and use can cause the top blade to wear down and become too small, causing the cut point to move.
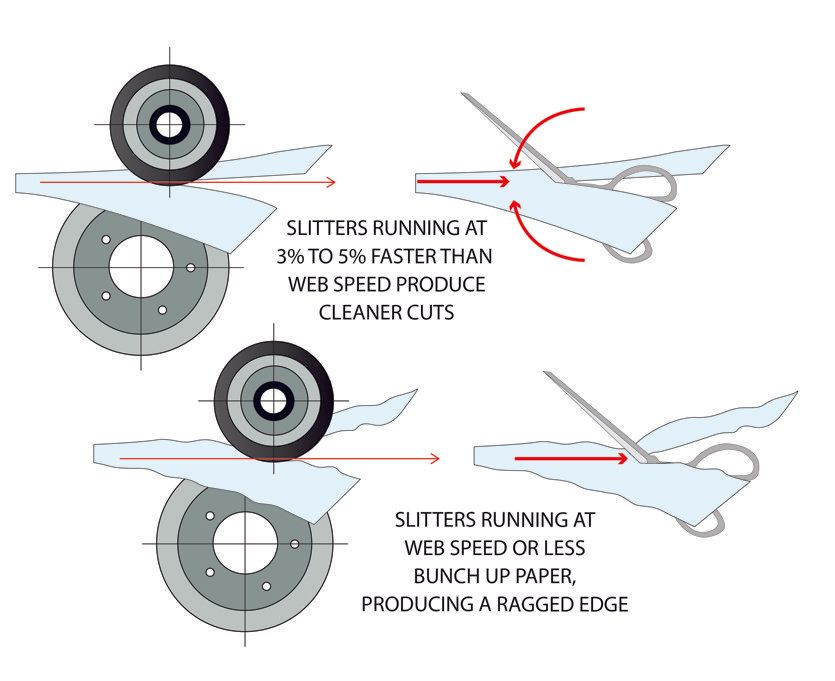
Is my slitter speed set for flawless results?
Setting the slitter to an optimal speed produces clean cuts.

The web bunches or tears and has a ragged edge.
Running slitters at web speed or less may cause the web to bunch or tear, producing a ragged edge.
I have a clean cut.
Over speeding the bottom band speed by 3 to 5 percent faster than the web speed increases cut quality and reduces the possibility of web breaks.
How do cant angles affect my blade life?
The right cant (shear) angle contributes to a longer blade life, which can reduce interruptions to your production and save money in the long-term.
My blades wear out quickly.
The steeper the cant angle, the faster the blade will wear.
I need to measure my cant angle.
Insert a feeler gauge between the top blade and the bottom band behind the cut point. The greater the chord (a straight line joining two points on a curve), the larger the measured gap will be.
How else can I make my blades last longer?
Seating the top blade each time a new blade is installed is a quick way to considerably increase blade life.
Step 1 Hold back on the bearing assembly to soften the initial contact between the top blade and bottom band when the blade is side loaded.
Step 2 Turn the blade in the opposite direction that it turns during normal operation. Continue spinning for three to four revolutions.
Step 3
Turn the blade in the direction of normal operation. While turning the blade forward, work the blade back and forth causing it to slip against the bottom band. Continue until the top blade runs quiet and feels smooth against the bottom band.
WANT THE FULL GUIDE?
We developed a full training guide on the principles of shear slitting. Learn about types of shear slitting, height adjustments, trouble shooting your cuts, terminology, safety guidance and more. Fill out your information below and you'll get instant access to the downloadable PDF.

